Now that you have your PC’s all up to date with some good free software (check it out here if you missed it) you really need to periodically clean the dust bunnies from your laptop or desktop. This post specifically deals with your laptops… stay tuned for part III to deal with your desktops.
This post will deal with cleaning the laptop step by step. I will follow up in a couple days with a post to walk you through cleaning your desktop. Pictures are included to give you an idea of how to approach it. If you need more detail in the picture, click on it to open to a larger size… you can always hit the back button (or your backspace key) to get back here.
LAPTOPS:
I lost my first laptop due to lack of loving (for lack of a better word). In 2001 I bought I brand spanking new Dell laptop, all the extras… worked great for college and then some. One day it just kaput on me when I was surfing. I tried to rescue it but by that point the damage had been done. The culprit… HEAT.
As you know, laptops put out a fair amount of heat (as you note your warm lap). The heat of the processors and memory chips are transferred though copper tubes to a heat sink. The heat sink has many little fins like the radiator on a car and has a fan that pulls air though it to maintain a consistent temperature.
The problem is, though normal usage, lint, dust, hair, etc. gets pulled in from the air and trapped on the fins. This reduces the efficiency of the thermal transfer. The less heat transfer there is, the harder your laptop has to work to overcome this energy loss. Eventually your laptop will suffer thermal issues like periodic shutdowns or eventual death.
When I opened my laptop up to see if I could diagnose the problem, I was appalled to find dust and lint completely blocking the airflow across the cooling fins. When I removed the copper heat pipe from the processor core, I found a nasty cracked silicon chip… a fatal wound.
I have since come across the same thing on two other laptops that I have helped to try to fix. Both of them were to far gone to save as well. You want to talk about being frugal… try taking care of what you have. Nothing is more frugal than being content with what you already have, so take care of your laptop and it will last many years more.
Cleaning the laptops cooling system is pretty easy as long as you have an idea of how it works.
Here is some theory:
The air is sucked in by a tiny little fan (usually on the bottom of the laptop) and sent across the heat pipes and usually exhausted on the back. If you aren’t sure of how yours works… leave it on for an hour or so until everything is warm, then feel around with your hand until you locate the source of the heat exhaust. Note this location. If you flip the laptop over you should see some kind of air intake, usually a louvered section. Note this location.
The goal in cleaning this is to get the dust bunnies OUT of the laptop. I use two tools for this, compressed air from my air compressor in the garage and a vacuum(shop-vac). (I do this in the garage to prevent dust from going all over the house).
Walkthrough:
- Step one: Ensure the laptop is off (IMPORTANT).
- Step two: Flip it upside down and place it bottom side up on a table or work surface (I put mine on a rag).
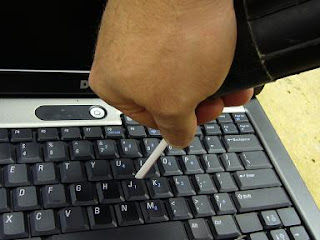
- Step three: Use a pencil/dowel/q-tip/(anything non-metallic) and inset into the louvers to hold your fan from spinning. If at all possible you want to prevent the little fan from turning to prevent damage. See pic.
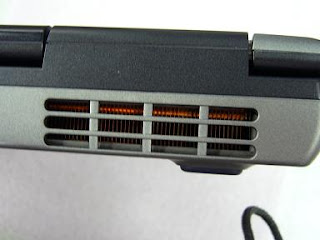
 Step four: While you have the fan stopped, use your compressed air nozzle and forcefully blow air into the louvers. You will most likely see a blast of dusty air/hairballs come flying out the back. Give it a couple shots of compressed air. Go ahead and blow off any other vents that may be on the laptop, mine had a vented cover on the memory cards. See pics.

- Step five: Take your shop-vac and try to pull out any remaining dust from the exhaust side that may have been loosened up. My vac has a huge hose, so I just use a drinking straw as my nozzle and hold my hand over the end of the vac hose. Get into the cracks as far as you can. They make real kits for doing this, but a straw is virtually free and always works well. The procedure is very simple, just cup your hand over the end of the hose while you hold the straw. This works very well for precise work like this. You can usually squish it good and get it right into the rear exhaust and get some dust out.


- Step six: This should take care of the cooling system (as best you can get to without opening the laptop up. Turn the laptop right side up and open the lid. Gently use your shop-vac/drinking straw setup to suck out all the nasties from underneath the keys. Be warned the keys come off easily and can be a booger to get back on, using the drinking straw virtually eliminates this risk… I am just warning you… because if you just put that big old shop-vac nozzle on the keys, it will likely suck a couple off, then you have to dig them out of it. Been there, done that, not fun.
- Step seven: Go back in the house and fire up that laptop. You can enjoy surfing (my blog, hint hint) knowing that you just extended the life of your investment.


Its a very easy process, and you can easily do things differently, this is just how I do it. I usually clean the computers about twice a year now.
My work laptop (pictured) is new (a couple months old) so it really isn’t that dirty. I have cleaned some laptops a year old and have found considerable amounts of dust and lint. When my old laptop died, it was caked in there, I literally grabbed a corner and peeled it out. NASTY.
Thank you for a great post! We lost a laptop last week and I have a feeling this was part of the problem. We were just discussing how to take better care of the next one so your post is very timely. And yes, those keys are a bugger to put back on – my toddler has torn off a few!
I love your post. They are very helpful,informative and makes full of sense. Thanks for sharing your knowledge.